
How to Enable Gzip Compression in WHM For All Websites
Enabling Gzip Compression can speed up your website. Faster websites make visitors happy. This guide will show you how to enable Gzip Compression in WHM globally. It’s simple and quick.
What is Gzip Compression?
Gzip Compression reduces the size of your website files. Smaller files load faster. It compresses HTML, CSS, and JavaScript files. This makes your website faster and more efficient.
Benefits of Gzip Compression
By enabling Gzip compression, you can make your website faster, more efficient, and more user-friendly. It’s a simple change that brings many benefits!
1. Faster Page Load Times
Gzip compression reduces file sizes, which speeds up page loading. Users experience faster browsing, leading to a better overall experience.
2. Reduced Bandwidth Usage
Compressed files use less bandwidth. This can lower hosting costs and make your site more efficient, especially during high traffic periods.
3. Improved SEO Rankings
Search engines favor faster websites. By speeding up your website, you can improve your SEO rankings and visibility.
4. Enhanced User Experience
Quick load times mean happier visitors. A faster website keeps users engaged and reduces bounce rates.
5. Lower Data Transfer Costs
Smaller file sizes mean less data to transfer. This is particularly beneficial for users on mobile devices or with limited data plans.
6. Better Server Performance
With smaller files, your server can handle more requests efficiently. This reduces the load on your server and improves its performance.
7. Simple Implementation
Enabling Gzip compression is straightforward. With a few configuration changes, you can quickly boost your website’s performance.
8. Enhanced Mobile Performance
Mobile users often have slower connections. File compression helps your site load faster on mobile devices, improving accessibility.
10. Cost Savings
Reduced bandwidth usage and improved server performance can lead to significant cost savings on hosting and data transfer.
Step 1: Install mod_deflate Module
1. Log in to WHM 2. Go to EasyApache 4 3. Customize Profile 4. Find the mod_deflate module and enable it. 5. Review the changes you’ve made. Click the “Provision” button to complete the process.
Step 2: Enable Gzip Compression
1. Navigate to Home » Service Configuration » Apache Configuration » Include Editor 2. Edit Pre VirtualHost Include (All versions) as per shown in below screenshot: 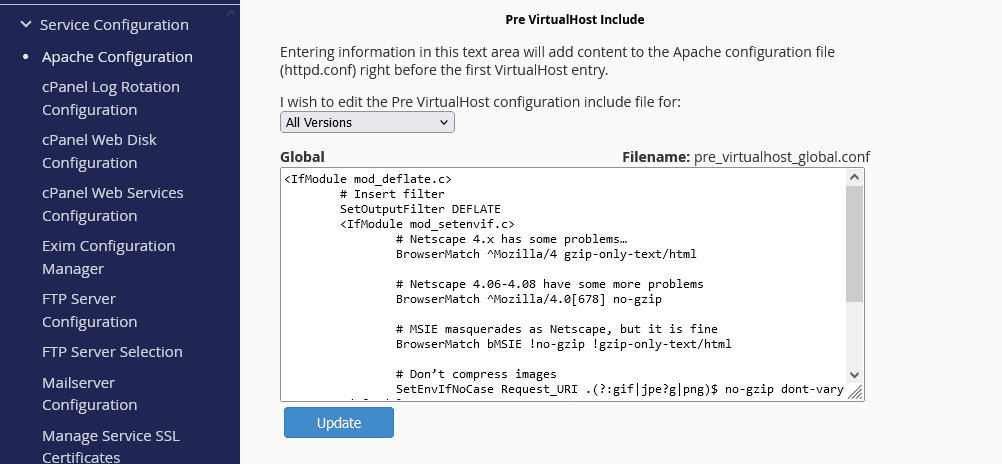 Keep in mind that you may find this section blank with no previous code or config. 3. Update Pre VirtualHost: Append the below configuration to the Pre VirtualHost editor and save it. Don’t overwrite any existing configuration, that are added for other purposes.
<IfModule mod_deflate.c>
Insert filter
SetOutputFilter DEFLATE <IfModule mod_setenvif.c>
Netscape 4.x has some problems…
BrowserMatch ^Mozilla/4 gzip-only-text/html
Netscape 4.06-4.08 have some more problems
BrowserMatch ^Mozilla/4.0[678] no-gzip
MSIE masquerades as Netscape, but it is fine
BrowserMatch bMSIE !no-gzip !gzip-only-text/html
Don’t compress images
SetEnvIfNoCase Request_URI .(?:gif|jpe?g|png)$ no-gzip dont-vary </IfModule>
<IfModule mod_headers.c>
Make sure proxies don’t deliver the wrong content
Header append Vary User-Agent env=!dont-vary </IfModule> </IfModule>
4. Save the changes and restart Apache button will appear. Restart Apache service to apply all changes. This is how you can enable Gzip Compression globally for all website hosted in the WHM panel. Now go to this link and check one of the domains hosted on your server if it is working or not. If everything is configured properly as per our guideline, Gzip should be enabled.
Was this article helpful?